
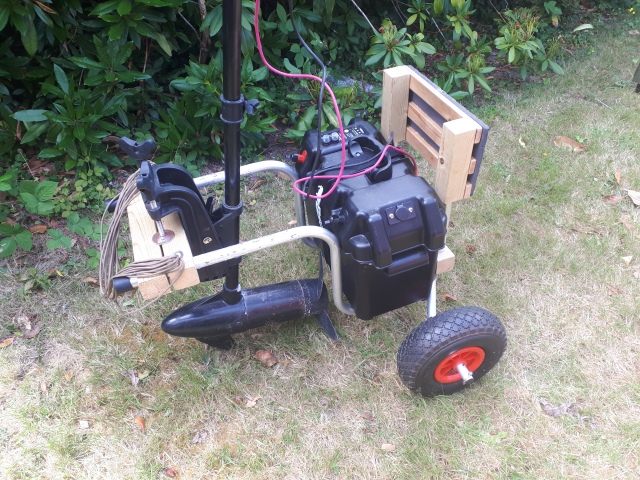
As this post now already has a three photo evolution of the Outboard Chariot, why not the final working prototype? Here she is! All the hoped for adaptions working with a few new ones on top!

Update June 2020 – Final prototype, post-assembly. The Mk. V now has wheels! Next step to test with battery and motor attached. Pulling handle currently just loops of paracord. Just need some wing nuts to be able to quickly remove/assemble wheel mount and I’m done for now. Link to more photos here.
The series of posts about this development contains side and rear mounted motor mounts. All have their merits and provide a base for creating your own design to fit your craft. The side mount gives the easiest access to control, as the rear mounted versions all require uncomfortable stretching to reach the throttle bar. A bit of plastic pipe, split at one end and then taped over the throttle is a simple way to get around this (can’t recall where I saw that in a post years ago).
Ahh, I’m awake, the sun has returned! Final update to this post before it is just a bunch of links! April 2015 – Here it is, as pictured below, before final testing The Mount The Iron Gym method still gives the best cheap DIY base offering the various design options you can try.
Link to second installment including trolling motor comparison research and more links for spares/kit.. Now with all amp draw ratings for Bison motors kindly provided by Craig at Fishing Mad
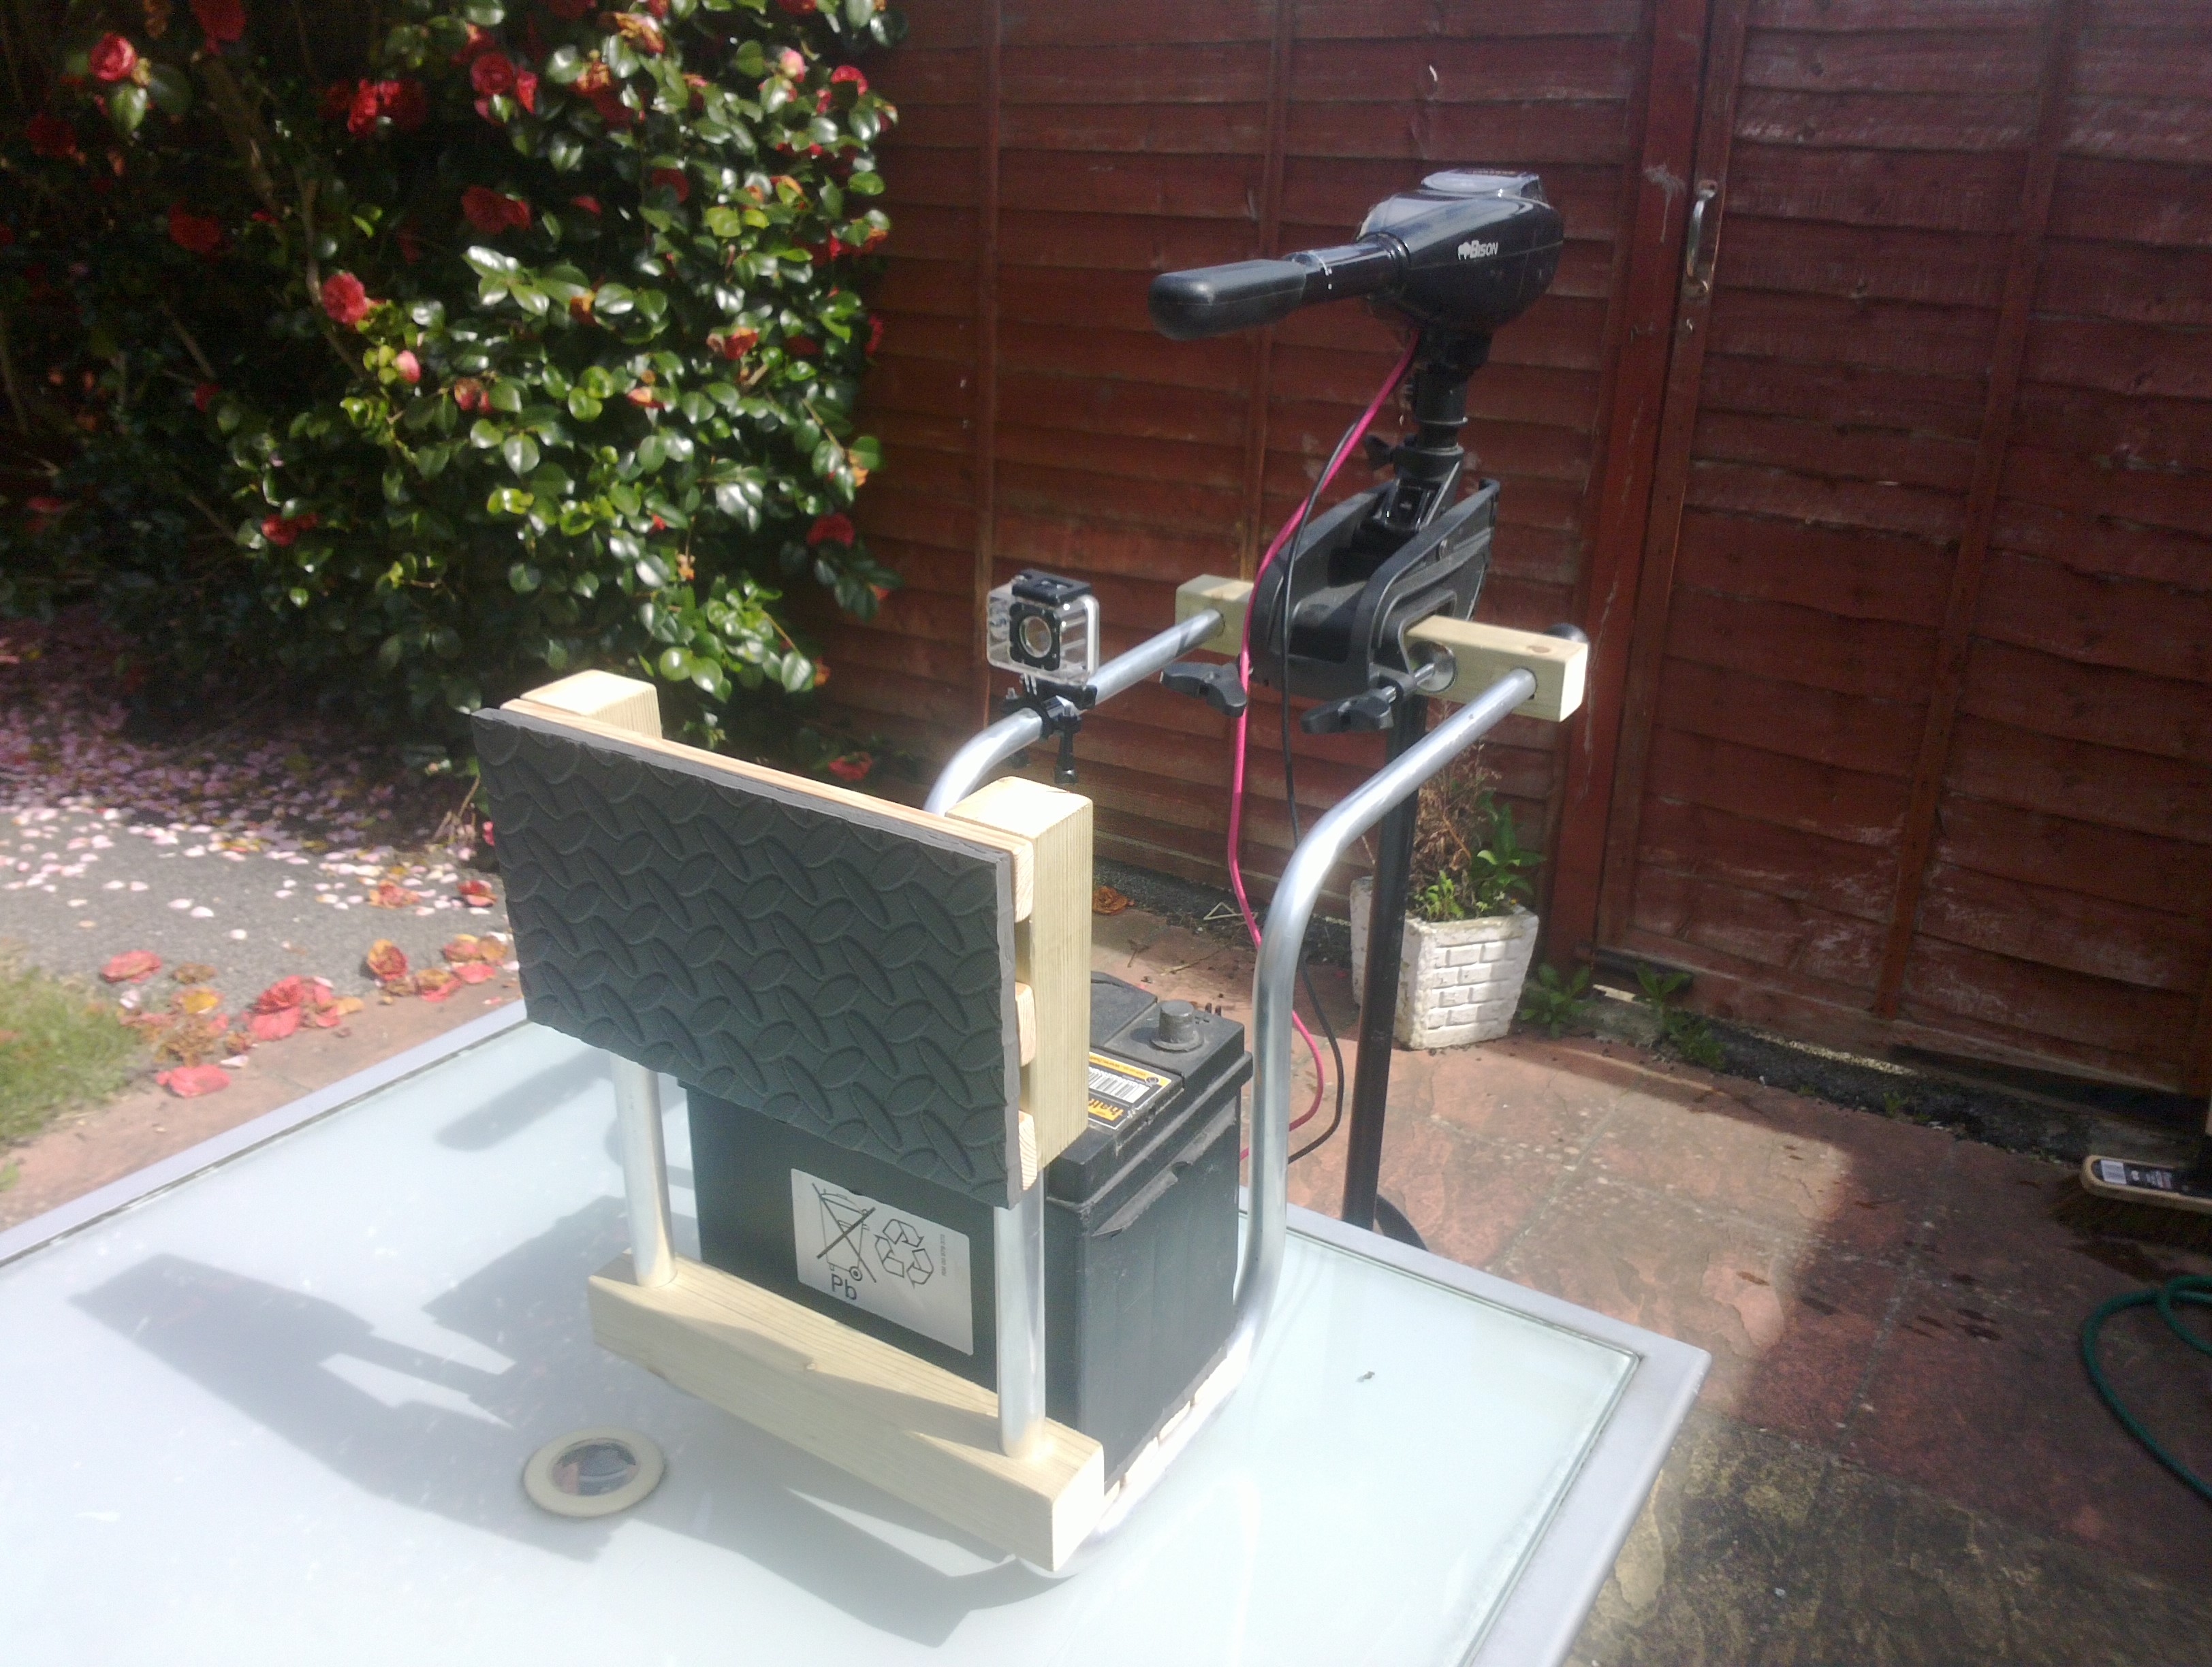
Update: 24th July 2014 – Here’s a photo of the motor mount prototype Mk. III. Basically, this is designed to be mounted at the rear of the kayak and I’ll be giving it a field test this weekend. It is simpler, more compact and removes the need for the battery to balance the mount. So far, it has taken the full weight of the 62lb Bison motor, out of the water, without straining the bladders and feels more secure than the Mk. I already. Will post results and photos or a video on the build and installation into the kayak once testing is complete. (Still using mostly the same basic gear as in this post)
30th July 2014 – Link to latest test results on this aft motor mount – best design to date!

Hmm, I didn’t think my first ‘how to’ guide would be in this vein, rather something akin to the recent bug I uncovered in Backup Exec 2012. Ah well, I did also say I’d only do so if I couldn’t find any similar online guide and for some reason mounting an outboard motor on an inflatable kayak isn’t a common occurrence.
I’ve messed around with boats of one kind or another for most of my life and love spending time in, on, by and under water. I haven’t recently had the chance to do so and I thought rather than rent a canal boat for a few days as a holiday last week, I’d spend the money on a kayak and electric outboard.
I’d first tried out an electric outboard at Henley Regatta in 2009 and was very impressed by the smooth, silent running, let alone the number of glasses of Pimms and champagne shared with people on shore intrigued at how I professed to be piloting a ‘solar powered’ boat. (I was charging the leisure batteries back on shore each day with a small 60W solar array from Maplins) The silence of the motor when trolling back at 1am to my mooring allowed me to witness ducks asleep on the water undisturbed until I was nearly a metre away from them! Something I had never seen in all the years of paddle or combustion engine boating.
On spending a day out on the Thames in the new kayak last week I really began to strongly feel that conversion to electric motors should be made mandatory on British waterways for many leisure and entertainment craft. Many moorings already have mains power to them and craft sit idle for long periods so this wouldn’t be a difficult change to enact for so many obvious benefits.
Anyway, on with the guide. First the caveats.
I in no way suggest that you are crazy enough to do what is outlined in this guide unless you choose to do so entirely under your own recognisance and taking responsibility for your own actions. I am merely sharing an idea I have tried in order to add to other’s inspiration in trying their own concepts.
I treat any excursion on water with extreme care and respect for the dangers inherent and strongly suggest the same for anyone else. Check tides, currents, weirs and weather conditions and often even better, talk to the locals if you don’t know the waters you are travelling on. Wear appropriate garments and protection.
In any small vessel, I always find that slow, considered movement is the key to remaining dry and in your vessel. Plan what you want to achieve, do so slowly and smoothly and you will minimise any dangers.
The Build – Background
My aim at the start was to provide a cheap, simple and light platform to mount an electric motor on to an inflatable kayak and ensure I could carry the full kit by myself from car to launch point and in the kayak.
I liked the look of the Adventure Plus kayak and with the new ‘backpack straps’ it seemed ideal (They’re not exactly comfortable but also not presumably designed for long use). I put in the orders and now the only thing that remained was how to mount the motor.
I had seen various methods employed on rigid hull canoes and kayaks but the only ones I saw that look viable (and I am still considering trying) were using plastic boxes like milk crates to hold a battery that had a couple of wooden boards overhanging to the side/back that the motor could mount onto. The principle of using the weight of the battery to counter the weight of the motor being an ideal bonus.
My only other consideration at the time was to build a hinged wooden box/shelf contraption that would again balance the battery against the motor but fold down for easy transportation. Using a good hardwood for water tolerance made me feel that this may be too cumbersome or heavy to be viable for transporting. Cost would also factor.
Investigating further, I noted a rounded metal rod based mount on an inflatable RHIB that looked like a modified fender holder with some marine-ply bolted on for the motor mount. The curve of the metal rods, fitted well around the hull of the RHIB and appeared to either be fixed or counterbalanced inside the RHIB.
I then saw that my door mounted chin-up bar had a similar curving and a cross bar that reminded me of motor mounts I’d seen previously such as Intex make. I grabbed the motor, wound the grips to their fullest extent and failed to grip the plastic cross bar. Still, the principle seemed sound and upon inflating the kayak and placing the chin-up bar in the kayak, it slotted in as if it were made for it. I then purchased a length of timber to test further both on and off water and am now at the stage of making some final tweaks to get it finished.
I have now tested the mount twice and although I am not entirely happy with some aspects, it is entirely fit for purpose and most importantly works in terms of balance, control and stability. As the final improvements will require my ‘Dremmelling’ skills, I am considering if trying to make my own tubular supports that provide the exact frame shape I require is a better aim and to leave this working prototype as is so I can use it as a chin-up bar again! (I’m also looking at making a frame for mounting simple outriggers next)
Parts Guide
- 1 x Sevylor Adventure Plus inflatable kayak – Simply Inflatables
- 1 x Bison 62Lb thrust electric motor (overkill but to be used on other vessels so go with your preference) – Fishing Mad. They do all sizes of Bison motor and now a Bison battery box
- 1 x Halfords 70Ah Leisure (Deep Cycle) battery (or similar battery of personal preference)
- 4 x Bungee cords (2 x ~30cm, 2 x ~70cm)
- 1 x Pro Fit Iron Gym chin up bar (Yes, really! I think I got mine at Robert Dyas ages back but you’ll probably have to try Ebay..) – Official site
- 1 x Wood beam ~ 45 x 5 x 5cm (Teak/Iroko or your preference)
- 2 x Nut/Bolts/Washers M6 diameter (I used 100mm for testing which are a bit long)
- 1 x Box/tray to sit battery in (I would consider/suggest a proper battery box to keep battery and connections dry in case of rain or splashing Bison battery box)
- 1 x Piece of foam/cushioning to put between motor mounting base and kayak hull
Tools
- Drill
- Number six wood drill bit
- Spanners/pliers to tighten bolts
Build – Modifying Frame
When receiving your ‘Pro Fit Iron Gym’ you would need to assemble it. Build as per the guide and then rather than fitting the plastic bar, use the plastic bar as a template to drill two holes in the wooden beam you purchased separately. (I used a size 6 wood drill bit)

Fit the wooden beam to the bars above rather than below the metal fixing locations as in the photo. It is better to have the excess bolt pointing upwards rather than down to avoid puncture/tear concerns.
Inflate kayak!
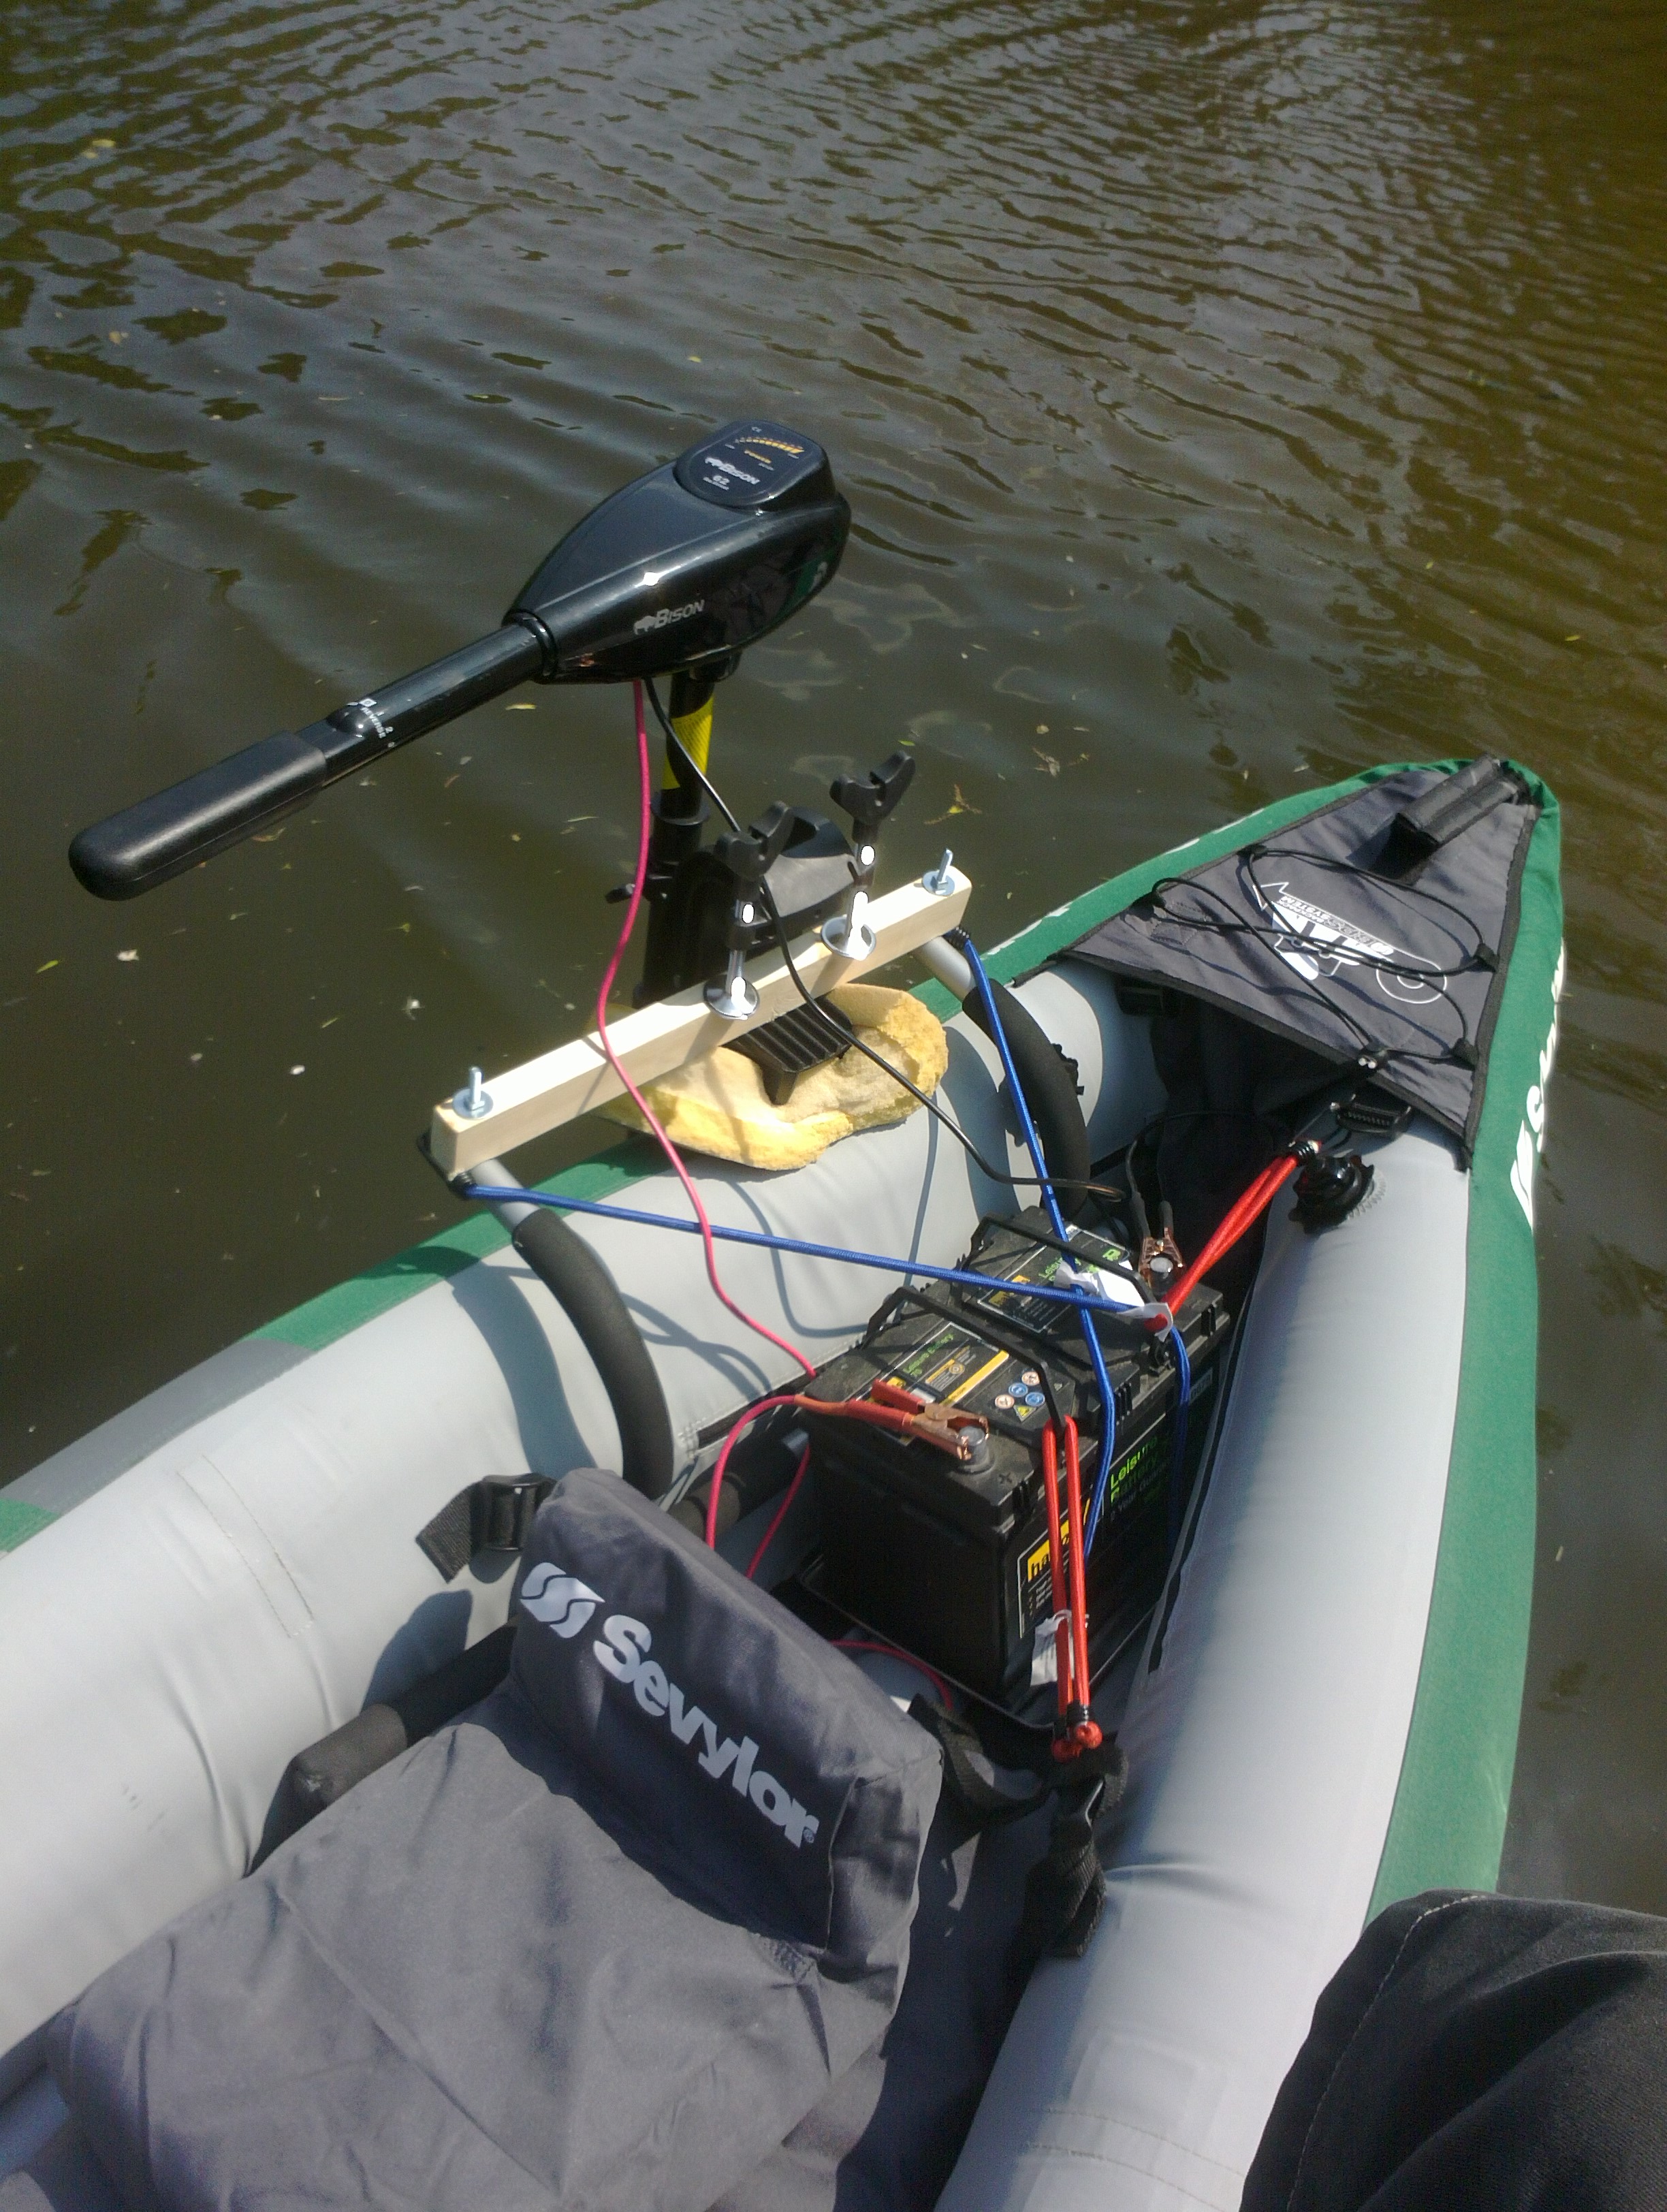
Slide (let’s call it the mounting bar) the mounting bar into the kayak with the rearward pointing bar sliding under the splash guard and the front of the bar fitting under the rear seat strap. (The two vertical bars rest on or beside the inflated floor and are one of my concerns in terms of their being too long and creating two, high pressure points on the inflated floor which are the pivots for the whole assembly.)
Place battery (in box or on tray) into rear of kayak behind the seat and in between the two vertical struts of the mounting bar. Hook and loop longer bungee cords under battery, crossing over and coming back to the end of each vertical curved bar on the mounting bar (there are two holes in the plastic end pieces on the bars that the bungee hooks fit into perfectly).

Hook and loop short bungee cords to battery and affix one end of each to the backpack strap clip under the splashguard and the other to the clip for the seat support. (Please note, I realise that the Halfords batteries have carry handles that make this easy where other battery makes may not)

Mount motor on wooden part of mounting bar, tighten and adjust angle. Then lift motor mounting and place foam between mounting and kayak hull. Finally, connect battery. Note: The photos don’t show the final 5 x 5 cm strip of wood hence the motor tightening screws overhanging.
Zoom…!
I didn’t put it in the part list for the build but this trolley is perfect for loading the battery, motor, backpack, pump and other bits. It then folds down and stows easily in the kayak. The full kit above weighs in at under 50Kg and with only the kayak’s 14.5Kg on my back, the rest fits onto the trolley.
Testing
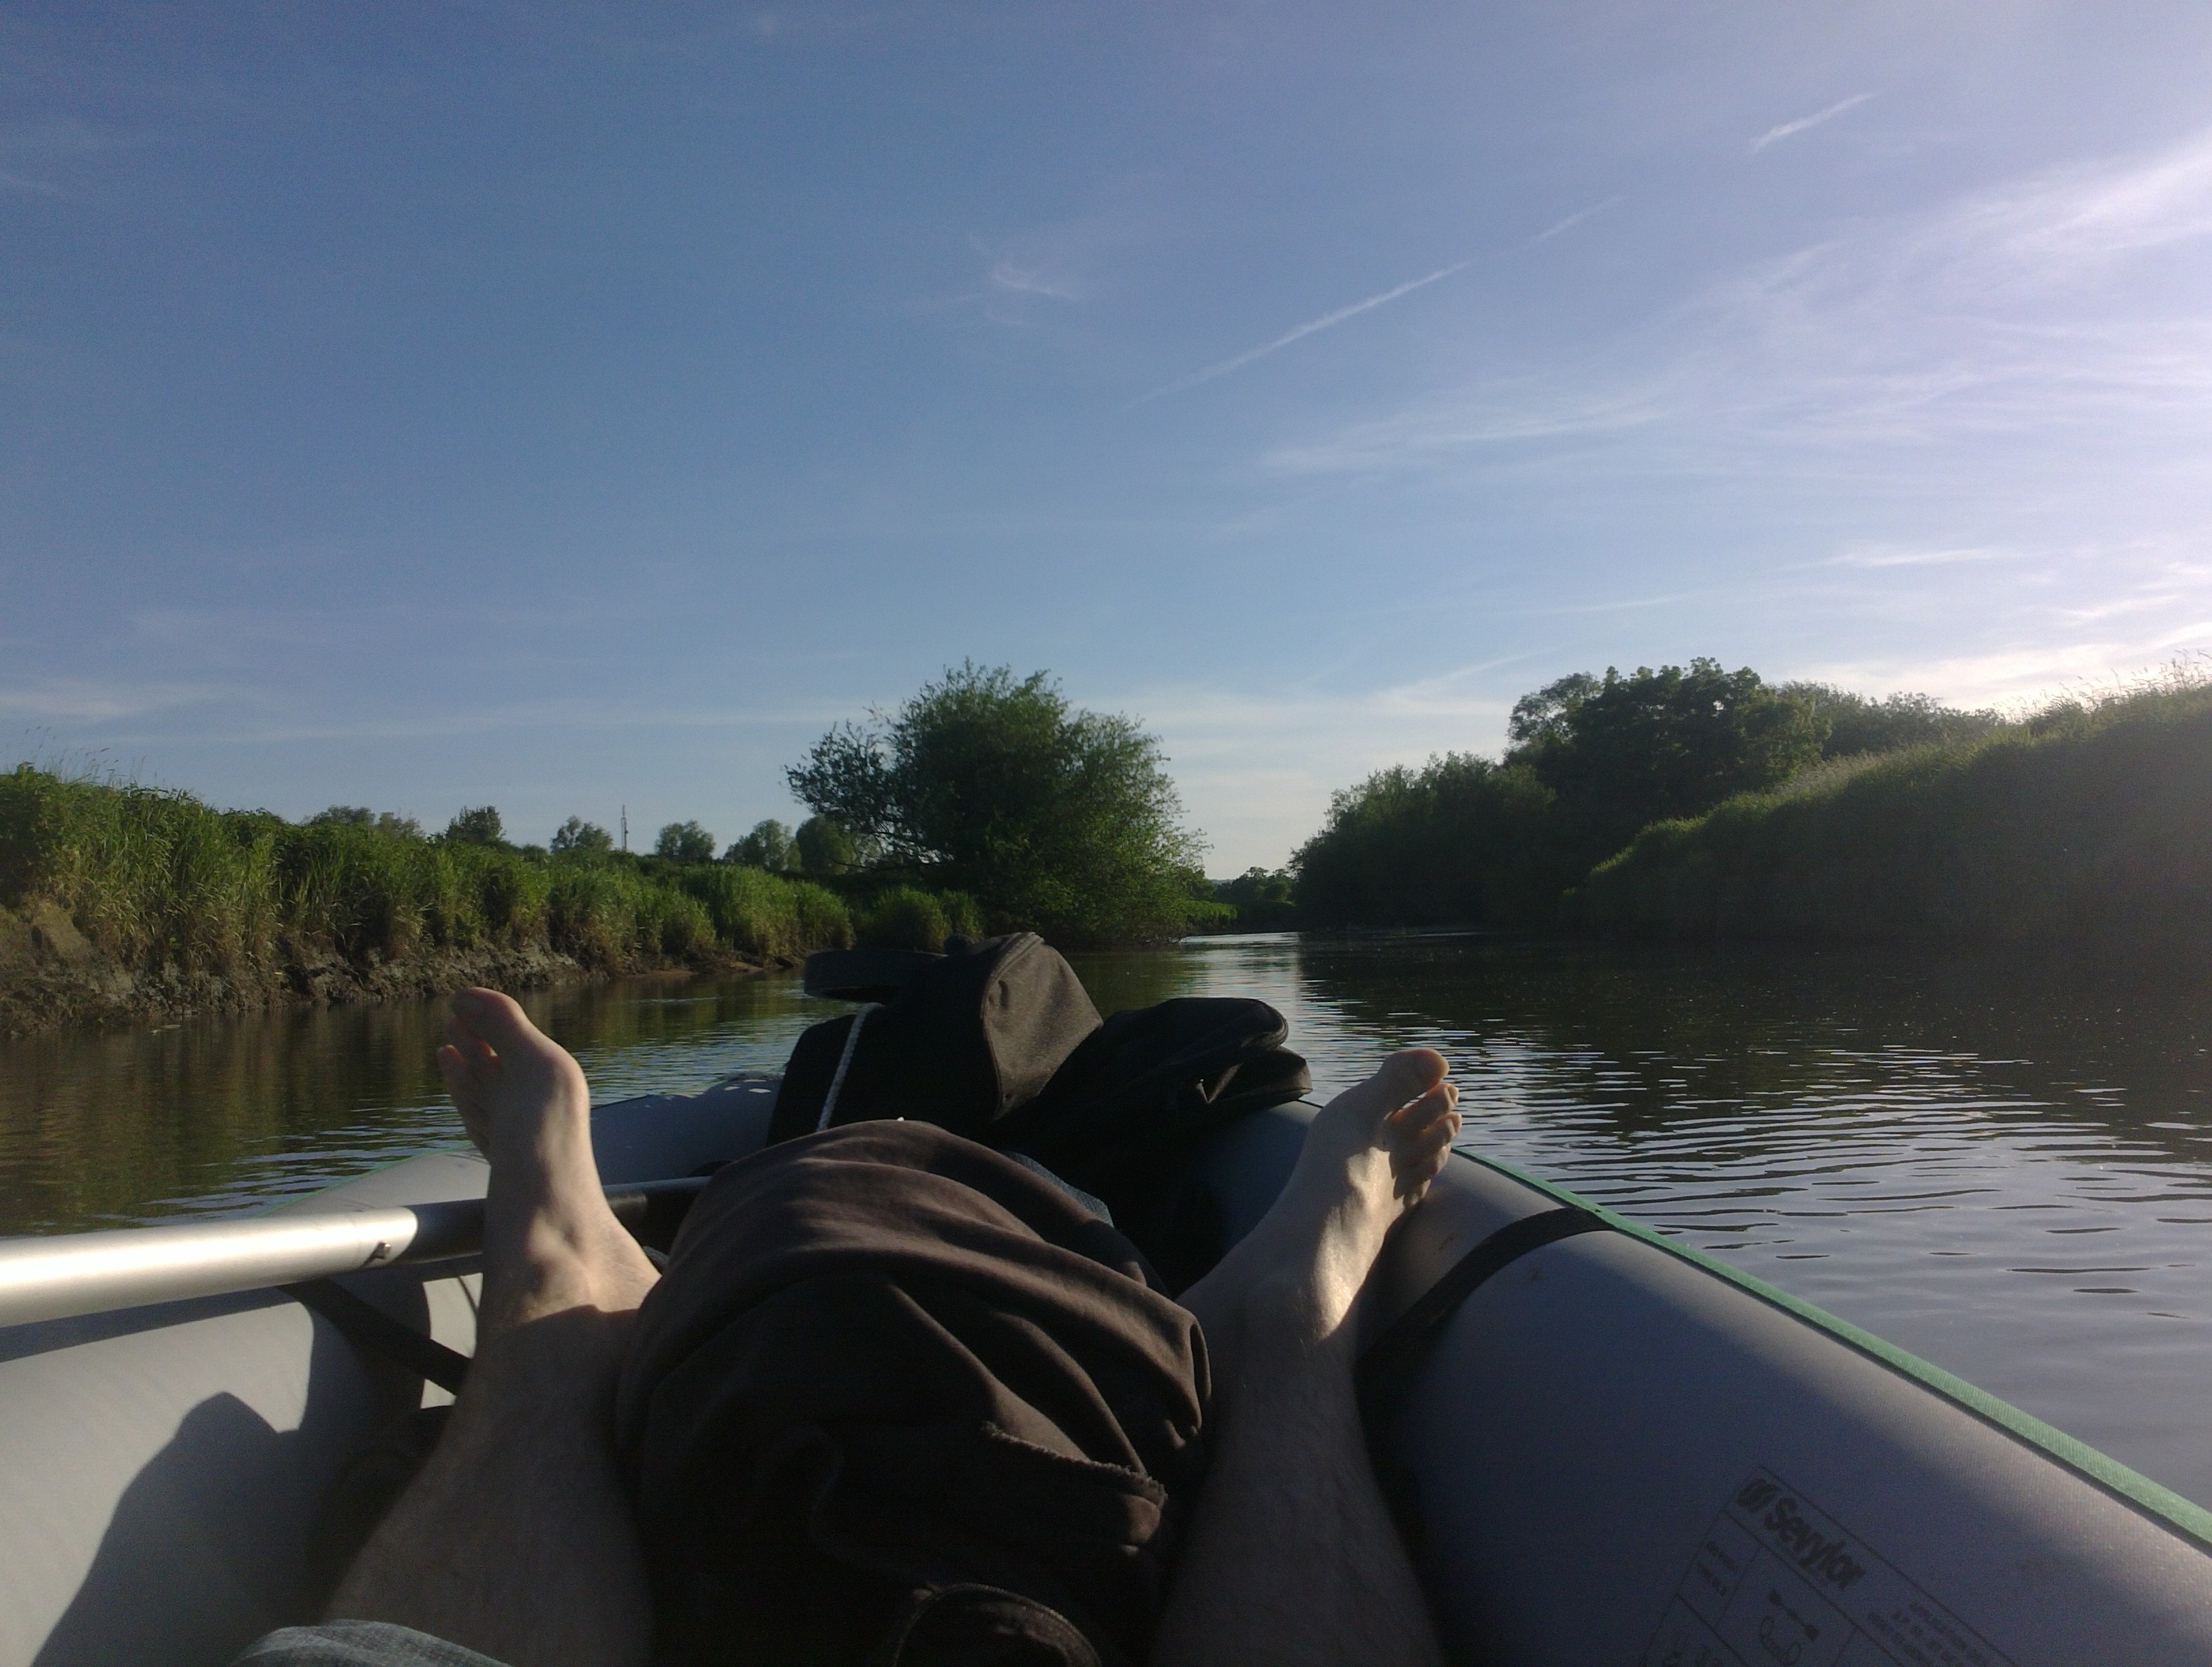
Well, no point going to all of this trouble without seeing if it worked! Last week I took the whole kit out to the River Arun and launched at Pulborough slipway. As a first taste of a tidal river I certainly messed up the tide timings and ended up launching in about three inches of water surrounded by various obstructions sticking out and threatening my lovely new kayak hull.
I didn’t obviously mount the motor until I’d reached a deeper section and had moored to a sunken tree but once fitted, ran against the current at about level one on the motor mostly, running up to level two or three at heavy flow points.
As I was completely unaware of the river depths, I mounted the propeller quite high and only ran into heavy underwater plant life a couple of times, posing minor navigational problems. After a relaxed trundle up to Stopham and back, taking about three hours and using the motor for about two, the battery still registered at nine out of ten on the Bison battery gauge.

Considering at that point I had also used only long wood screws to fix the wood to the mounting bar, I felt it was a complete success. Landing at 9:30pm at really low tide was another matter and I really learned a bit more respect for the Arun after being thrown around and under Pulborough Bridge before managing to beach and unload!
The second test, two days later with bolted mounting bar, was on the Thames with the prop lowered at different levels through the day and to see just how long a single charge would last. (Manual states the Bison 62Lb drawing 58A at full load) After a full day of trolling about mainly at about motor level two of five, the battery finally gave out, of course just as I was passing above a weir!
I think it important to note that if inspecting or relying on the Bison motor’s battery gauge, stopping the motor to kneel up in the kayak and view the gauge results in the gauge registering more than the battery has remaining. In therefore stopping and checking the gauge which still registered at 5/10 remaining, once under load, this changed to 1/10. I’m therefore adding my small 12v battery tester to my essentials kit now.
I reckon I managed to get about six hours of motor use out of that battery all told, so would work to a max of about five to avoid the really low battery level that I hit. I really wasn’t rushing about and only used level three or above to fight the current or wind at times but still feel very impressed and much more confident to look at longer excursions with the motor as a backup to get me back or out of tidal misfortunes/miscalculations.
With the higher power of the 62Lb motor, I wouldn’t recommend using level five with a fully charged battery on the kayak. The strain on the mount is greatly increased as the gearing seems to change dramatically between levels four and five, resulting in a massive surge of power. The stability of the kayak also then changes and increases the danger of accidents. My intention to use this motor on another small dinghy is the only reason I went up to that size and I’d certainly recommend going a degree lower to save on motor weight and battery life.
Conclusion
For the aims I set out with, I feel I have achieved what I required. I can fairly easily load, unload, launch and land the kayak in various conditions with the full motor kit, paddles and a couple of backpacks of supplies and sundries. I could even, at a pinch, transport the whole kit on a train should I end up a great deal further than I expect! Certainly makes a lot more bother than just loading up the kayak, pump and paddle but for longer excursions and lazy days it is ideal.
How about cost? Well, the only things you need to make the motor mount are the wood, chin-up bar, two bolts, four bungees and some foam. £20-40 depending on the wood. Spurs me on to make outriggers for less than the £200+ price tag I’ve seen for some!
I’ll write an update with final photos when I complete the project and as ever, on looking at my work so far have thought of possible improvements. I am wondering if turning the bars the other way up could make a mount that includes the outrigger fittings if only on one side of the kayak.

Nice article!
The pictures of you out on the water in that sunshine looks like a must do experience… I envy you!
Keep the Motorized “how to’s” Comin’!
Thanks Ben, I was really lucky with the weather last week. Is certainly a peaceful and relaxing way to travel.
i got a jago ETBM02 46ib trolling motor 36 inch shaft ,seems a bit heavy to me do you think it would do if not i may send it back., was no mention of weight on amazon.
Hi Steve, I’m just mid-way writing an update on my experiences and will be noting my concerns about deforming the shape of the Adventure Plus. The Bison 62Lb weighs in at about 10Kg. I worked on the premise that the motor/prop is the heaviest part and once in the water, buoyancy would help. It does but I am also finding I’m best leaning on the opposite side to the motor to compensate for the weight and the side with the motor does lean outwards, closer to the waterline in any case. Propulsion rather than performance is the aim so I’m happy but also alternate the side I load the motor on to ensure symmetry if nothing else.
I think with the higher sides to the Adventure style kayak, the higher weight motors will be more of a concern. For the Hudson/Colorado style the hand grips that stick out would potentially make the rig stand too high. (Hence a consideration of removing the hand grips from the chin-up bar) Anchoring the whole rig to the opposite side’s strap buckles with the short bungees does provide a good degree of support from the other side too.
Basically, try it and see. I really thought there was no way it would work with the 62lb after lifting it and I was pleasantly surprised. I’m still experimenting and think the frame needs to change but have used it three times now as per the guide and have no major concerns and enjoyed some very relaxing trips.
I’d heartily recommend loading the rig without the motor and ensuring all is fastened, get the motor on board and then walk into the water (if possible!) and mount the motor whilst still standing. That way, any imbalance will be apparent and easier to counter and you’re less likely to drop the motor into the water! I launched from Shoreham harbour a couple of weekends ago and spent about seven hours trolling along the coast and swimming around the anchored kayak (climb back in on the opposite side to the motor!!). I only used the motor for about two and a half hours and managed to travel just to Hove Lagoon and back to the harbour running at 1-1.5 Knots.
All the best,
Napoleon
How can I stop the kayak going around in circles with the electric motor mounted on the side?
Hello Mike,
Sorry for the delay in replying, have been extremely busy since summer hols finished.
Reminds me of how I used to wonder how one could paddle a coracle! (Still like to know if there is a particular method) Thorpe Park used to have round motor boats with motors mounted on them that you’d use like bumper cars!
As you can see from the photos, the motor is mounted as far back as is possible behind the rear seat. This means that the degree one has to steer to compensate for the lateral force is much lessened. In other words, for the speeds we’re talking about, I haven’t noticed any particular strain and have, when tightening the mountings, been able to lock the motor in position and steer in a leisurely fashion just by leaning left or right. (on wide rivers and open sea and wind permitting!)
I’m sure someone with greater understanding could explain the relationship between how much to compensate against how far from the rear of the vessel the propulsion is mounted. Presumably similar for how far from the centre to the front or for how far from centre when mounted at the rear of a wider vessel..
I have been considering a box construction, holding the battery as a counterbalance, that would hold a frame to extend the motor over the back but I want to be sure it isn’t too cumbersome and is completely secure. I saw one link where a milk crate had been converted and a bit of wood bolted on! Given the home-made nature of the current mounting in the first place, it feels comforting to be right next to the motor also in case I needed to grab it. (I must admit I’m much more relaxed on trips without a big leisure battery and motor inches from the water)
Hope this helps and happy kayaking!
Napoleon
Hi, I just bought the Adventure Plus and took it out on the Thames below Teddington Lock for the first time with my wife and child. I was surprised by how much I enjoyed the boat given the fact that I have only used Old Town canoes in the past. We couldn’t fit an Old Town in central London so I think the Sevylor Adventure Plus has proved to be a good compromise.
I have a quick question for you. I am interested in fitting a light electric outboard on mine as well but am pretty sure I would be required to register the canoe as a ‘powered’ vehicle with the Environment Agency in order to use it on the non-Tidal portion of the Thames (upstream of Teddington Lock). This means I would need insurance and to pay the power boat registration fee (rather than the canoe fee). Did you go through all of that? Or is this something I shouldn’t really worry about.
Thanks much!
Peter
Hi Peter,
I agree the enjoyment that can be had in these is fantastic when considering the portability especially. Planning a very late first trip of the year right now in fact! Our family used to launch a small motor cruiser around that stretch of the Thames in the 1970s, great memories.
I honestly couldn’t tell you for sure what legislation covers the use of electric motors on any stretch of the Thames. Following the strict adherence to terminology relating to the Thames that I know though, any ‘motorised pleasure launch’ using the Thames must be registered. Having now spent a half an hour reading EA forms for licensing it appears to fall under one of two possible requirements. Engine and motorised are key but the form does cater for electric power if not those advertised in thrust rather than HP. (I’d suppose most trolling motors would be under 1/2 HP, if that) It isn’t exactly far different to people’s tenders using a trolling motor and I’d expect they are still expected to register.
1. A full year license which in the terms of the EA form states if “kept or used” at a minimum size of 5 Sq.m. at £91.30 or
2. A visitor license which can be obtained to cover 1 day, week or month at a time for a minumum daily charge of £11 per day.
Both forms do state a 25% discount for solely electric powered craft which would cover the Sevylor so either a daily cost of £8.25 or £68.48 for the year. Could it be reduced further on a pro-rata basis if one agrees to paddle a certain percentage of the time? 🙂
Of course you’re expected to have a name on both sides and at the stern and insurance so not really something which is going to appeal to the recreational use we are considering, the non-digital registration form to be filled out 10 days in advance of any journey may also take that spur of the moment aspect away if not going for a full year’s license.
I’m feeling luckier I guess at living only a mile from the sea and a few small waterways these days.
Still, in the modern world of untaxed electric cars, why not boats? There have been electric boats on the Thames since the late 1800s and the impact of a small trolling motor is surely negligible and not polluting the water. Worth talking to the EA directly I’d say to see if they take the same view the various EA boats (I still call them TC’s! – Thames Conservancy) I have heard of who wave hello and look on in interest when persons using Adventure Plus’ with trolling motors attached pass by on the Thames.
Whatever else legislatively, the people on the river all the time follow the same principles we all should, safety before all else followed by respectful and careful use that doesn’t impact the waterway. I have fished, swum, boated throughout my life in and around the Thames and can honestly say the use of electric power is one of the best means of further improving the quality of the habitat for everyone.
If you do go with a motor mount do check and test out your overall load weights with the three of you! (Though my battery and motor are pretty hefty so am cautious even though I’ve now tested her close to shore in the sea!) The urge to hold one hand on the motor in case the self-crafted mount fails goes after a while also..
Powered or paddling, I’m sure you’ll have loads of fun with your Adventure Plus!
Regards,
Napoleon
Hi Peter,
Just a quick update. I had a lengthy chat with a very helpful guy at the EA yesterday and besides finding out about a lot of the interesting developments in alternative energy production (still very under invested in my opinion) along the Thames and the provision of charging points at various locations, I discussed how motorised kayaks/canoes would be considered.
It is as one would expect on reading the guidance. Anything floating (or submerged?) on the Thames and using an engine/motor is treated as a launch and subject to the licensing rules for a launch. He admitted no powered paddle boards had been registered yet and felt it would be an amusing consideration for the future.
Puts me in mind of a silly competition to create the most bizarre form of craft that could be considered a launch in the vein of the good old Great Egg Race. Elastic band powered launches subject to a motorised launch tax.
Whilst some may consider an environmental impact tax against launches on the Thames to be a better approach than the current 25% discount incentive to use electric power, I would imagine that the private boat owners lobby just on the Thames could garner enough support to quash that idea for now!
Regards,
Napoleon
I just purchased a Sevylor Colorado hunting & fishing inflatable. I’m going to try your idea with the pro gym to mount a trolling motor. If you have any suggestions I would greatly appreciate it.
Thanks
Lutheran
Hi Lutheran,
Taking the latest aft mount as an example I’d first say that the motor mounting bar may be better fitted to the square hole ends (You’ll see on the bars) of the pro gym bars as I believe the Colorado’s sides aren’t as high as the A-Plus.
Do keep an eye on the two points on the pipes that will be in contact with the deck, I often sat them into the tray I held my battery in (There aren’t any sharp points though and the plastic caps spread the pressure)
Other than that, the rule I’ve followed has been to raise the kayak up in the garden and see if I can secure the mount/motor/battery out of the water. If it sits safe (bouncing it around as in the water) with the heaviest part of the motor pulling down, then I know I’m ready to water test it.
Although most men who’ve asked about the mount have commented “Oh no, i want the biggest possible motor” when I’ve suggested a 20-30lb thrust motor would be sufficient, it really is down to personal choice.
I’ll leave off for now with that and the news that today I finished preparing a test rig with some professionally bent aluminium pipe and I am literally about to pump up the A-Plus in my hallway to test fitting the parts together. (Reminds me of a fishing rod holder a friend made from plumber’s copper pipe years ago!)
This mount will provide at least two fishing mount points and could potentially provide a four mount point fishing box holder when not using a motor/battery.
Best of luck and please feel free to reach out for any advice or to share experiences!
Regards,
Napoleon
Thanks a lot. I’m new to this. But you have been an inspiration.
Lutheram
You are most kind and welcome. I’ve popped up a quick post so you can see the next frame taking shape in case it helps spur any more ideas. https://napoleonmoses.wordpress.com/2015/03/19/the-idea-takes-form/
Tight lines and fair skies!
Napoleon